Emergency Response Overview#
When a company experiences a hacker intrusion, system crash, or other security incidents that affect normal business operations, it is necessary to respond promptly to restore the company's network information system to normal operation in the shortest possible time. Further investigation of the source of the intrusion, restoration of the intrusion incident process, and providing solutions and preventive measures to recover or reduce economic losses for the company.
Common emergency response event categories:
Web intrusion: webpage defacement, homepage tampering, Webshell
System intrusion: virus Trojan, ransomware, remote control backdoor
Network attack: DDOS attack, DNS hijacking, ARP spoofing.
Basic Information Acquisition#
This part of the basic information acquisition can be achieved using Linux's own commands or tools. This part includes system information acquisition, network information acquisition, process information acquisition, user information acquisition, service information acquisition, file information acquisition, file permission information acquisition, SUID information acquisition, current user login information acquisition, and system command information acquisition.
System Information Acquisition#
uname -a Get the current system kernel version
ifconfig Get relevant network information
netstat -napt View the current open ports
lsof -i Display the relationship between processes and ports (Linux)
netstat -an |grep tcp View all TCP connections including Listen status
netstat -an |grep syn View all TCP connections including Listen status
top -c Quickly view process commands
ps -aux View process associations
a: Display all programs under the terminal, including programs of other users
u: Display program status in user-oriented format
x: Display all programs without distinguishing the terminal
pstree Intuitively display the relationship between child processes and parent processes
cat /proc/Process ID/maps View some related files associated with the process, such as so, etc.
lsof -p 21269(PID) View process occupancy information
User Information Acquisition#
cat /etc/passwd Check for abnormal users
awk -F : '$3==0{print}' /etc/passwd View users with UID 0
more /etc/sudoers | grep -v "^#|^$" | grep "ALL=(ALL)" View accounts with sudo privileges
awk '/$1|$6/{print $1}' /etc/shadow View account information that can be remotely logged in
Check the contents of the home folder under root permissions through the command line. Generally, a folder with the same name as the username will be created in the home folder when a new user is created.
Service Information Acquisition#
The startup scripts of various services under the Linux system are stored in the /etc/init.d/ and /etc/xinetd.d directories. You can check if there are any abnormal scripts in these directories.
In addition, you also need to check the cron jobs. You can use crontab -l to check the cron jobs of the current user, and crontab -u username -l to check the cron jobs of the corresponding username.
File Information Acquisition#
Search files based on file name characteristics: grep -rni "www" *
Search by file size: find / -size 114k(file size)
Search by creation time: find ./ -mtime 0 #Search for files modified within one day
A brief introduction to the parameters:
-ctime -n Search for files modified within n24 hours
-ctime n Search for files modified between n24 hours ago and (n+1)*24 hours ago
-ctime +n Search for files modified more than (n+1)*24 hours ago
[alclm]min [last access|last status change|last content modification]min
[alc|m]time [last access|last status change|last content modification]time
A brief introduction to the parameters:
Several types of time for Linux files (using find as an example):
atime: Last access time, such as ls, more, etc., but chmod, chown, ls, stat, etc. will not modify this time. You can use ls -utl to view in this time order;
ctime: Last status change time, such as chmod, chown, etc., the status time changes but the modification time does not change. You can use stat file to view;
mtime: Last content modification time, such as saving after vi modification, if the modification time changes, atime and ctime will also change accordingly.
File Permission Information Acquisition#
/etc/passwd default permission is 644, with a minimum permission of 444. First, check the permission of this file to confirm if the configuration is correct:
ls -l /etc/passwd
shadow default permission is 600, with a minimum permission of 400. Check the permission configuration:
ls -l /etc/shadow
Current User Login Information Acquisition#
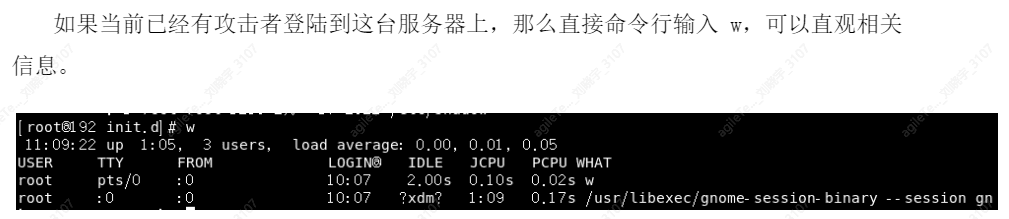
A brief introduction to these fields:
1. USER field displays the username of the current logged-in system
2. TTY field displays the terminal assigned to the user session. ttyX indicates console login, pts/X and ttypX indicate network connections
3. FROM field displays the IP address of the remote login host
4. LOGIN@ field displays the local start time of the logged-in user
5. IDLE field displays the length of time since the last process started running
6. JCPU field displays the time used by all processes on this console or network connection
7. PCPU field displays the processor time used by the current process in the WHAT column
8. WHAT field displays the processes currently running by the user
System Command Information Acquisition#
In some cases, check if the system commands are correct. Virus Trojans may disguise themselves as system commands, so you need to confirm the original commands.
ls -alt /usr/bin/ | head -n 10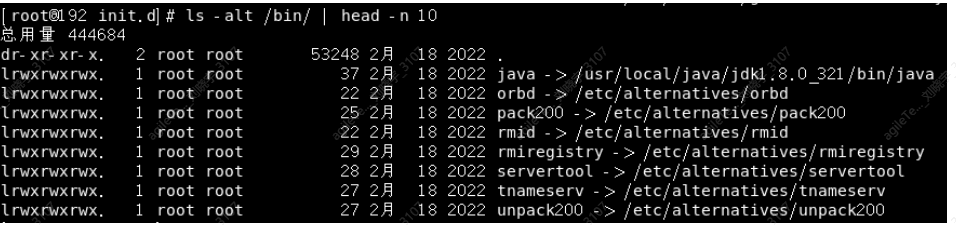
Check the commands executed by the account through .bash_history
1. Root's command history
history
2. Open the .bash_history in the home directory of each account and add the IP address and execution time of the historical command to the command history:
1) Save 10,000 commands
sed -i 's/^HISTSIZE=1000/HISTSIZE=10000/g' /etc/profile
Linux Log Analysis#
Important files
/var/log/wtmp
/var/log/utmp
/var/log/lastlog - Key files of the log subsystem, record user login information, all with timestamps
/var/run/wtmp - Permanently records each user's login, logout, and system startup
var/run/utmp - Records information about each currently logged-in user. It changes with user login and logout
var/log/lastlog - Records the most recent successful login event and the last unsuccessful login event generated by log. It is a binary file and needs to be viewed with the lastlog command. If a user has never logged in, it will be displayed as "Neverloggedin". System accounts such as bin, daemon, adm, uucp, mail, etc. should never log in. If these accounts are found to be logged in, it indicates that the system may have been compromised.
The following are some commonly used messages logs
The messages log of RedHat is located in /var/log/messages. The messages log records running information and authentication information. It is very helpful for tracing the login behavior of malicious users. For example, the following is an su log:
Mar 22 11:11:34 abc PAM_pwdb[999] failure;cross(uid=500)->root for su service
Cron log
The cron log of RedHat is recorded in /var/log/cron by default, mainly used to record the log of crontab.
Secure log
Linux's SSH login log is stored in /var/log/secure. If there are a large number of consecutive login error messages in the log, it may mean that the remote host is trying to crack the SSH login password.
Last log
The last command is used to view the recent user login information. The last command reads the contents of wtmp. In Linux, there is also the lastlog command, which is used to view the last login information of all accounts in the system. The command reads the contents of /var/log/lastlog.
Shell log
Bash logs are stored in the .bash_history file in the user's directory. Some attackers may execute commands after SSH login, so this log may record the executed commands. The log stores the number of entries and the shell variable $HISTSIZE
Common tools
chkrookit:
chkrootkit is a local rootkit detection tool for UNIX/Linux.
chkrootkit official website: http://www.chkrootkit.org/
General operation guide:
Compilation:
tar xvzf chkrootkit.tar.gz
cd chkrootkit-xxx
make sense
Detect rootkit: ./chkrootkit -q
If you use a Live CD to boot the host and mount the original host hard disk (being invaded) under /mnt, you can use the -r parameter to specify the root directory of the invaded host for offline inspection. chkrootkit only outputs suspicious items in the end:
./chkrootkit -q -r /mnt
rkhunter:
Rootkit Hunter provides more detailed and accurate results than chkrootkit. If conditions permit, it is recommended to use Rootkit Hunter for a second check of the system.
Rootkit Hunter download access: http://sourceforge.net/projects/rkhunter/
General operation guide:
Install Rootkit Hunter:
tar xvzf rkhunter-xxx.tar.gz
cd rkhunter-xxx
./install.sh --layout default --install
(If you customize the installation path, you need to execute: ./install --layout custom /custom_path --install)
Use Rootkit Hunter: rkhunter -check (if you customize the installation directory, you need to write the full path)
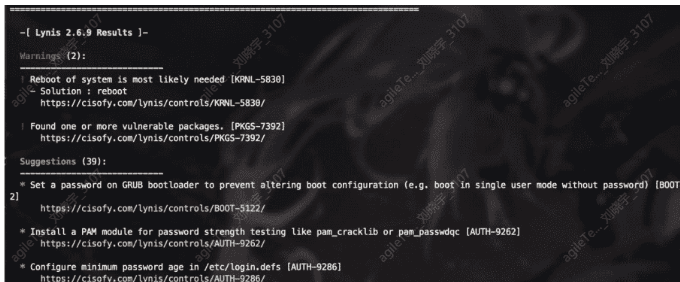
lynis:
I recommend this one. The above two are no longer maintained, and this tool can not only check for rootkits but also audit some Linux security baseline aspects. It is recommended to run as root, and the effect will be better.
Project address: https://github.com/CISofy/lynis
General operation guide:
cd lynis
./lynis audit system